
-
By:
- collin
- No comment
wifi repeater user manual
WiFi repeaters effectively boost your existing wireless signal, extending coverage to areas previously unreachable. This user manual section details how they function and their benefits.
These devices are crucial for eliminating dead zones and ensuring a stable connection throughout your home or office, enhancing overall network performance.
What is a WiFi Repeater?
A WiFi repeater, sometimes called a wireless range extender, is a device designed to receive your existing WiFi signal, amplify it, and then rebroadcast the strengthened signal. Essentially, it acts as a bridge between your router and devices located beyond the router’s effective range. Unlike a traditional router, a repeater doesn’t create a new network; it extends an existing one.
It connects wirelessly to your primary router, mirroring its signal. This extended signal allows devices further away to connect with a stronger, more reliable connection. Repeaters are particularly useful in larger homes, buildings with thick walls, or areas where wireless interference is prevalent. They are a cost-effective solution for improving WiFi coverage without needing to run new cables or invest in a mesh WiFi system.
Benefits of Using a WiFi Repeater
Employing a WiFi repeater offers several key advantages. Primarily, it significantly extends WiFi coverage, eliminating dead zones and improving signal strength in previously unreachable areas of your home or office. This leads to a more consistent and reliable internet experience for all connected devices.
Repeaters are also a cost-effective solution compared to upgrading your entire router system or installing new network cabling. They are relatively easy to set up and configure, often requiring just a few simple steps. Furthermore, they enhance the performance of existing devices by providing a stronger signal, resulting in faster speeds and reduced buffering. A repeater boosts convenience and connectivity throughout your space.
Common WiFi Repeater Issues
Despite their benefits, WiFi repeaters can sometimes present challenges. A frequent issue is reduced bandwidth; repeaters halve the available bandwidth as they re-transmit the signal. Connection problems, where the repeater fails to connect to the primary router, are also common, often resolved by pressing the WPA button on both devices.
Interference from other wireless devices can disrupt the repeater’s signal. Incorrect configuration, such as mismatched security settings, can also cause connectivity issues. Identifying the repeater on your network can be tricky, sometimes requiring network scanning tools like nmap. Finally, corporate network restrictions may prevent repeater functionality or access to necessary configuration tools.
Unboxing and Hardware Overview
Carefully unpack the repeater and verify all components are present. This section details the device’s physical features, including ports, buttons, and LED indicators for status.
Package Contents
Upon opening the package, ensure you have all listed items. Typically, your WiFi repeater package should include the repeater unit itself, a quick installation guide to get you started swiftly, and a power adapter specifically designed for the device. Some packages may also contain an Ethernet cable, useful for alternative wired connections during setup or for utilizing the repeater as a wireless bridge.
Carefully inspect each item for any physical damage that may have occurred during shipping. If anything is missing or damaged, immediately contact the retailer or manufacturer’s support team for assistance. Retain the original packaging for potential returns or warranty claims. A complete package ensures a smooth and hassle-free setup process.
Identifying Key Components (Ports, Buttons, LEDs)
Familiarize yourself with the repeater’s physical features. You’ll find a power port for connecting the adapter, and often an Ethernet port for wired connectivity or initial setup. A crucial component is the WPS button, used for simplified pairing with compatible routers – pressing it initiates a secure connection.
LED indicators provide vital status information. A blinking light usually signifies setup mode, while a solid green light indicates a successful connection. Refer to the manual for specific LED meanings. Understanding these components is key to a smooth installation. The reset button, often recessed, restores factory settings. Knowing their locations and functions will simplify troubleshooting and configuration.
Safety Precautions
Important safety guidelines must be followed during setup and operation. Always ensure the repeater is used in a well-ventilated area, avoiding placement near heat sources or direct sunlight. Do not disassemble the device; this voids the warranty and poses electrical hazards.
Keep the repeater away from water and moisture to prevent damage and potential shock. Use only the provided power adapter to avoid compatibility issues and potential fire risks. Regularly inspect the power cord for damage. This device is intended for indoor use only. Improper handling can lead to malfunction or injury. Follow all local electrical codes and regulations for safe operation.
Initial Setup & Powering On
Begin by plugging in your WiFi repeater. Allow approximately one minute for signal establishment, indicated by a stable, blinking green light—a crucial first step!
Plugging in the Repeater
To initiate the setup process, carefully plug the WiFi repeater into a standard electrical socket. Ensure the socket is easily accessible and provides a consistent power supply. Avoid using extension cords or power strips if possible, as they can sometimes interfere with the signal.
Once plugged in, the repeater will automatically power on and begin its startup sequence. This initial phase may take up to a minute as the device initializes its internal components and prepares to connect to your existing wireless network. During this time, observe the LED indicators on the repeater; they will provide visual cues about the device’s status.
It’s important to position the repeater midway between your router and the area experiencing weak signal strength for optimal performance.
Understanding LED Indicators
The LED indicators on your WiFi repeater provide crucial feedback regarding its operational status. Initially, you’ll likely see a blinking light, signifying the device is powering up and searching for a signal. A stable, solid green light generally indicates a successful connection to the primary router.
However, different colors and blinking patterns convey specific meanings. A red light often signals a connection issue or a problem with the power supply. A slowly blinking blue light might indicate the repeater is in setup mode, awaiting configuration. Refer to the detailed LED guide in this user manual for precise interpretations.
Pay close attention to these indicators throughout the setup process; they are your primary visual guide to ensuring proper functionality and troubleshooting any potential problems.
Waiting for Signal Establishment (Green Light)
After plugging in the repeater, allow approximately one minute for it to initialize and begin searching for an existing WiFi network. This initial phase is critical for establishing a stable connection with your primary router. Patience is key; avoid interrupting the process.
As outlined in this user manual, a steadily illuminated green light signifies successful signal establishment. This indicates the repeater has located and connected to your network. If the green light doesn’t appear after a reasonable duration, double-check the repeater’s proximity to the router and ensure the router is broadcasting a signal.
A blinking green light suggests the connection is still being negotiated. Continue waiting until the light becomes solid, confirming a reliable link.
Connecting to the Repeater’s Network
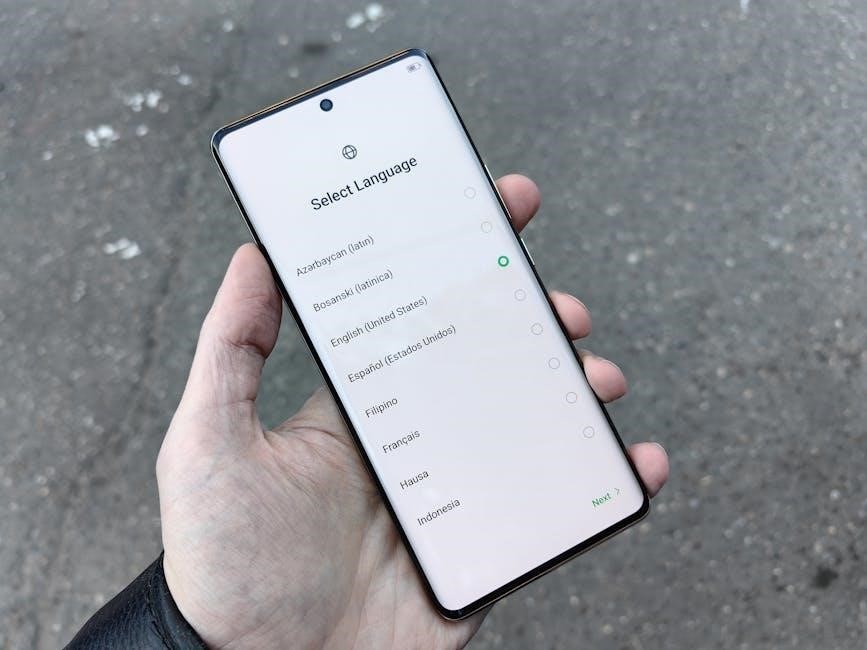
To configure your WiFi repeater, connect to its default network – typically Wireless-N – using your device. This allows access to the setup interface.
Connecting via Wireless-N (Default Network)
Upon powering on, your WiFi repeater broadcasts a default network, often named “Wireless-N”. This network is specifically for initial configuration and doesn’t require your existing WiFi password. Locate this network in your device’s WiFi settings (laptop, smartphone, or tablet) and connect to it.
Important: Do not attempt to connect the repeater directly to your router using an Ethernet cable at this stage. The setup must be completed wirelessly through the Wireless-N network. Once connected, your device will likely display a limited or no internet access message – this is normal. The purpose is to access the repeater’s user interface, not to browse the internet.
After successfully connecting to the Wireless-N network, open a web browser and proceed to access the repeater’s configuration page, typically by entering an address like 192.168.1.1 or mywifiext.net in the address bar.
Accessing the Repeater’s User Interface
With your device connected to the default “Wireless-N” network, open a web browser. In the address bar, type either 192.168.1.1 or mywifiext.net and press Enter. This will direct you to the repeater’s web-based configuration interface.
You may be prompted to enter a default username and password. Common defaults are admin for both fields, or admin and a blank password. Refer to your repeater’s documentation if these don’t work.
Once logged in, you’ll see a setup wizard or a dashboard. This interface allows you to configure the repeater’s settings, including selecting repeater mode, scanning for networks, and setting security options. Carefully follow the on-screen instructions to proceed with the setup process.

Repeater Mode Configuration
Selecting repeater mode is the core function, enabling the device to connect to your existing WiFi network and rebroadcast the signal for extended coverage.
Selecting Repeater Mode
To begin extending your WiFi network, you must first configure the repeater to operate in repeater mode. This is typically the default setting upon initial power-up, but verification is crucial. Access the repeater’s user interface through a web browser, as detailed in previous sections.
Navigate to the wireless settings or operation mode section within the interface. You should find an option to select between various modes, including ‘Repeater,’ ‘Access Point,’ and ‘Bridge.’ Choose ‘Repeater’ to enable the extension functionality. The device will then initiate a scan for available wireless networks in the surrounding area, preparing to connect to your primary router.
Ensure the selected mode is correctly applied before proceeding to the next step, scanning for your existing WiFi network.
Scanning for Existing WiFi Networks
Once repeater mode is selected, the device will automatically scan for nearby wireless networks. A list of available SSIDs will populate within the repeater’s user interface. This list displays networks within range of the repeater, allowing you to choose your primary router’s network for extension.
Carefully identify your network from the list – verify the SSID matches your router’s name. Select your network by clicking on it. The repeater may ask for the network’s password (security key) at this stage. Ensure you enter the correct password to establish a secure connection.
A successful scan and selection are vital for seamless integration with your existing WiFi infrastructure, extending coverage effectively.
Connecting to the Primary Router’s Network
After selecting your primary router’s network from the scanned list, you’ll be prompted to enter the network’s password, also known as the security key. This is crucial for establishing a secure connection between the repeater and your existing WiFi. Double-check the password for accuracy, as incorrect credentials will prevent connection.
Once the password is submitted, the repeater will attempt to connect to your router. This process may take a few moments. The user interface will display a connection status, indicating success or failure. A successful connection is typically indicated by a stable signal strength indicator.
Ensure a stable connection before proceeding to further configuration steps, guaranteeing optimal performance.

Security Settings & Network Name (SSID)
Configure your repeater’s SSID (network name) and security settings—WPA/WPA2—for a secure, personalized network. Default settings offer convenience, but customization is recommended.
Setting the WiFi Network Name (SSID)
The SSID, or Service Set Identifier, is essentially the name of your WiFi network. During repeater configuration, you’ll have the option to either use the same SSID as your primary router or create a new, unique one.
Choosing the same SSID creates a seamless roaming experience, allowing devices to switch between the router and repeater without disconnecting. However, some users prefer a distinct SSID (like appending “_EXT” or “24RP”) to easily identify the repeater’s network.
Carefully consider your needs when selecting an SSID. Avoid using personally identifiable information in the network name for security reasons. The interface will guide you through entering your desired SSID, ensuring it meets length and character restrictions.
Configuring Wireless Security (WPA/WPA2)
Securing your extended WiFi network is paramount. The repeater allows configuration of wireless security protocols, primarily WPA (WiFi Protected Access) and WPA2, offering robust encryption. WPA2 is generally recommended for its enhanced security features and compatibility with modern devices.
During setup, you’ll be prompted to enter a network key (password). This password should be strong – a combination of uppercase and lowercase letters, numbers, and symbols – and unique to your network.
Using the default security settings, which often mirror your router’s, is a convenient option, but remember to change the default password for optimal security. Ensure all devices connecting to the repeater use the correct password to access the network.
Using Default Security Settings
For a quick and straightforward setup, utilizing the default security settings is a viable option. Typically, the repeater will attempt to mirror the security configuration – WPA, WPA2, or even WEP – of your primary router. This simplifies the process, especially if you’re unfamiliar with network security protocols.
However, be aware that the default network key (password) is often pre-set by the manufacturer and may be easily discoverable online. It’s strongly recommended to change this default password immediately after initial setup.
While convenient, relying solely on default settings compromises security. Prioritize changing the default password to a strong, unique one to protect your extended network from unauthorized access and potential vulnerabilities.

Advanced Settings & Troubleshooting
Advanced settings allow customization of your repeater, including password changes and reboots. Troubleshooting often involves the WPS button or checking device IPs.
Setting Login Username and Password
Securing your WiFi repeater with a unique username and password is a vital step after initial setup. This prevents unauthorized access to your repeater’s configuration settings, protecting your network. During the setup process, typically within the repeater’s user interface, you’ll be prompted to create these credentials.
Choose a strong password – a combination of uppercase and lowercase letters, numbers, and symbols – to maximize security. Avoid using easily guessable information like birthdays or common words. Remember to record your new username and password in a safe place, as you’ll need them for future adjustments or troubleshooting.
If you forget your login details, a factory reset might be necessary, returning the repeater to its default settings. Therefore, careful storage of this information is highly recommended.
Rebooting the Repeater
Rebooting your WiFi repeater is a simple yet effective troubleshooting step for resolving various connectivity issues. Similar to restarting a computer, a reboot can clear temporary glitches and refresh the device’s operating system. Within the repeater’s user interface, usually found on the left sidebar, there’s typically a “Reboot” or “Restart” option.

Selecting this option initiates a controlled shutdown and restart of the repeater. The process usually takes a minute or two, during which the repeater will temporarily disconnect from the network. Avoid interrupting the reboot process, as this could potentially cause instability.
A reboot can resolve issues like slow speeds, intermittent disconnections, or failure to connect to the primary router. It’s a good first step before attempting more complex troubleshooting procedures.
WPS Connection Method (Pressing WPA Buttons)
WPS (Wi-Fi Protected Setup) offers a simplified connection method, eliminating the need to manually enter your WiFi password. This user manual section details how to utilize WPS. Locate the WPS button on both your WiFi repeater and your primary router – it’s often labeled “WPA”.
Press the WPS button on your router first, then immediately press the WPS button on the repeater. Both devices will begin flashing, indicating they are attempting to establish a secure connection. This process usually takes a few minutes.
Successful connection is indicated by a stable connection light on the repeater. If the connection fails, repeat the steps. Note that WPS isn’t always reliable and may be disabled on some routers for security reasons.

Identifying the Repeater on Your Network
This user manual section guides you in locating your repeater’s IP address. Network scanning tools, like nmap, or checking connected devices via your router’s interface are key.
Checking Device IPs via Browser
This user manual section details how to identify your WiFi repeater’s IP address directly through a web browser. After connecting to your network, open your browser and type “192.168.1.1” or “192.168.0.1” into the address bar – these are common router addresses.
You may be prompted for a username and password (often “admin” for both). Once logged in, navigate to the “Attached Devices” or “DHCP Client List” section. This displays all devices connected to your network, including their IP addresses.
Locate the device with a manufacturer name matching your repeater’s brand. Note its assigned IP address; this is crucial for accessing the repeater’s configuration interface directly. This method, while sometimes tedious, doesn’t require additional software.
Using Network Scanning Tools (nmap)
This user manual section explains utilizing network scanning tools, specifically nmap, to identify your WiFi repeater’s IP address. nmap scans your network and lists all active devices with their corresponding IPs. Download and install nmap on your computer.
Open your command prompt or terminal and type “nmap -sn 192.168.1.0/24” (replace “192.168.1.0/24” with your network’s subnet). nmap will display a list of IP addresses and associated MAC addresses.

Identify your repeater by matching its MAC address (found on the device itself) with the list. Note the corresponding IP address. Be aware that nmap usage might be restricted on corporate networks, and the repeater may not host a web server.
Considerations for Corporate Networks
This user manual section addresses deploying WiFi repeaters within corporate environments. Corporate networks often have strict security policies and IT infrastructure controls. Before installing a repeater, obtain explicit permission from your IT department. Unauthorized devices can violate security protocols and disrupt network stability.
nmap, a network scanning tool, may be prohibited due to security concerns. WPS (Wi-Fi Protected Setup) connections, utilizing the WPA button, might also be disabled for security reasons. Ensure the repeater complies with all corporate security standards, including encryption protocols (WPA/WPA2) and access controls.
IT administrators typically manage network configurations; circumventing these controls is unacceptable. Prioritize collaboration with IT to ensure seamless integration and avoid potential conflicts.
Extending Network Names (SSID)
This user manual section explains how to differentiate repeater networks by appending extensions like “24RP” or “50RP” to your existing WiFi SSID;
Appending to Existing SSID (e.g., 24RP, 50RP)
To easily identify the extended network created by your WiFi repeater, a common practice detailed in this user manual is appending a suffix to your original SSID. For instance, if your router’s network name is “MyWiFi,” the repeater might broadcast as “MyWiFi24RP” or “MyWiFi50RP”.
The “24RP” typically signifies extension on the 2.4 GHz band, while “50RP” indicates extension on the 5 GHz band. This clear naming convention allows you to seamlessly connect to the optimal network without confusion.
During configuration, the repeater’s interface will usually offer an option to automatically append these suffixes, simplifying the process. Remember to document these changes for future reference and troubleshooting, as outlined in this user manual.